an adventure into my cookbook collection: soul-searching, doing things differently & the truths I learn along the way...

deseeding pomegranates is feminine & erotic, unless you hit them with a wooden spoon...

urm..?

Wednesday, 23 January 2013

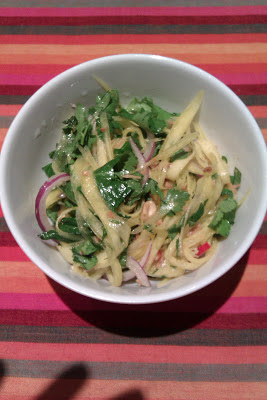
Vietnamese style mango salad


As you may know, I watch an awful lot of cooking television. A recent discovery is ‘Luke Nguyen's Greater Mekong’ which focuses on the food of the areas around the Mekong River - going through parts of China, Thailand, Myanmar, Cambodia, Laos and Vietnam. It is an area of the world I know comparatively little about, and it is fascinating. As Luke Nguyen is Vietnamese, I find it more culturally sensitive, and less excruciatingly touristy/voyeuristic than some of the other travel-based food programmes.

One part of the show that I found incredibly interesting was in part of Cambodia, where one of the local delicacies is deep-fried tarantula. They looked pretty terrifying, and apparently taste a little bit like peanut butter. Luke Nguyen explained that during the time of the Khmer Rouge, the people were starving and resorted to eating the spiders as a vital source of protein. It might be a little strange to think how what is essentially ‘food of our oppression’ could become a national dish – one might think that people would never want to eat that sort of thing again. But food memory doesn’t really work like that. There is the passover seder of course, and I’m sure a lot of the traditional ashkenazic foods were inspired by the scarcity and poverty of life in the shtetls and during the wars. I recently read that Japanese Ramen noodles have a similar heritage.

But anyway, this mango salad is nothing to do with oppression – it is just super delicious. I saw Luke Nguyen make a similar salad to this – also in Cambodia I think. This salad, and the similar version made with green papaya traditionally contain dried shrimps, and I am so pleased to have come across this recipe on Michael Natkin’s brilliant vegetarian blog Herbivoracious (see above) to inspire me to make a vegetarian version. I did however shred the mangoes in an authentic way (the most fun I have had in ages). Basically, you peel the skin from the mango, and carefully slice into it all the way around with a large heavy knife – creating little grooves. By peeling these grooves with a vegetable peeler, you get perfect strips of shredded mango. You could of course use a julienne peeler – but where is the fun in that?

About this recipe Michael writes: “Green mango (or papaya) salad is addictive. It hits all those sweet, tangy and fresh notes that wake up your palate at the beginning of a meal, or refresh it after a bite of spicy curry.”  

Serves 4 

- Juice of 1 lime
- 2 tsp sugar
- ½ tsp salt
- 1 tbsp toasted sesame oil (optional)
- 2 under-ripe mangos, shredded into fine strips
- ½ red onion, cut into very thin rings and soaked briefly in cold water 
- 1-2 small chillies, finely sliced (I used 1 red one)  
- 1 big handful fresh coriander leaves, shredded not too fine (fresh herbs, coriander especially I find, tend to go mushy if chopped if they are still really wet from washing – a salad spinner is perfect for this)
- 1 handful fresh mint leaves, shredded not too fine
- 1 tbsp chopped salted peanuts (for passover, substitute with salted cashews)
- 1 tbsp crispy fried onions – you can either do this yourself by frying onions with salt until brown and crispy, or buy them ready-made in packets. Obviously I went for the packet option. I love these onions – they are also brilliant as crouton in soups or other salads.

Combine the lime juice, sugar, salt ginger, and sesame oil. Mix well to dissolve the sugar. Taste and adjust the balance of flavours if needed.  

Just before serving, combine the dressing with the mango, red onion, chilli and most of the herbs and peanuts. 

Garnish with the remaining peanuts, fried onions and herbs. 


Monday, 14 January 2013

Mars Bar Rice Crispy Squares

For as long as I can remember, these have been one of my ultimate favourite treats. Chocolate rice crispy squares are pretty standard, learning-to-cook-in-primary-school fare, but these ones really are the best. I think it is probably the combination of familiarity, or nostalgia, with the fact that they just taste so fucking amazing that makes them so magical. You may in fact not want to know the recipe, as it takes some of the wonder away - to be honest, if you give me enough cuddles and cups of tea I will probably make you some.

The old-school-y-ness of this recipe can be seen by the fact that the quantities are in ounces. With thanks to my mum for giving me the recipe.

Ingredients

The quantities couldn’t be simpler – you need one ounce of rice crispies and salted butter per large Mars bar. For a standard sized rectangular cake tin, use 4 ounces of rice crispies, 4 ounces butter and 4 large Mars bars.

I tend to double this – using the large rectangular dishes that are roughly the same size as one full oven shelf (8 oz. rice crispies, 8 oz. butter, 8 Mars bars).

You will also need some dark chocolate to melt over the top – approx. 150-200g for the ‘4 bar’ size, and 300-400g for the ‘8 bar’ size.

Method

Chop the chocolate bars finely, and melt them slowly with the butter in a bain marie or large heatproof bowl over a pan of simmering water. Be careful that no steam from the water goes into the buttery-chocolate. Once the chocolate and caramel has melted, you will need to take the bowl off the heat and give it a good stir/pound to break down the little lumps of nougat and create a smooth consistency – if you do this on the heat, the chocolate will be at risk of splitting.

When the chocolate mixture is smooth, quickly mix in the rice crispies and press into a flat, shallow cake tin/foil dish (as described above). It may look like not enough goo to make the squares chocolatey enough, but trust me it does.

Leave the rice crispies to set in the fridge, and cover them with a layer of melted dark chocolate when completely set – ie. the next day. Leave to set and cut into squares to serve.

Wednesday, 9 January 2013

Celeriac soup with smoked garlic

I don’t think I had ever even tried celeriac until I first made the Celeriac Sofrito at Rumi’s Kitchen, but now I am a little bit obsessed. I think that maybe it is because I feel a little like a Masterchef contestant every time I use it. This recipe is much more Masterchef-y than the sofrito, I suppose you could make it thicker and turn it into a puree – once you managed to get the hang of those artful little spoon-swipes they seem so fond of. It makes me wonder – do the contestants on Masterchef, especially Masterchef: Professionals, realise that everyone is making celeriac puree and spoon-swiping it? If I ever competed on Masterchef, I think that a tactic to winning might be to make something different to what everyone else was making. But that’s just me, and I love being contrary.
Don’t be put off by the smoked garlic – it isn’t difficult to get hold of. I found it in an Asda superstore in Bournemouth, two massive cloves in a box for £1.50. I’m keeping them in a ziplock bag for the time being, as the smoke smells incredibly intense. Their taste is much more subtle then the smell, and I really love it.
This soup is rich, thick and creamy, perfect for miserable weather days. I have been taking it into work for the past few days and it has definitely hit the spot.
Serves 4-6
1 celeriac, peeled and chopped into smallish chunks
1 large potato, peeled and chopped
1 large onion, diced
Cooking oil
1-2 cloves smoked garlic, smashed with the side of a heavy knife and chopped finely
1 vegetable stock cube, dissolved in a mug of hot water
2 bay leaves
½ tsp. paprika
2 tbsp. crème fraiche (optional)
½ tsp. dried tarragon (optional)
Salt and pepper
Boil the kettle.
Heat the oil in a large saucepan and sauté the onion or a low-ish heat for 5-10 minutes, or until translucent and softened. Add the garlic and paprika and continue to fry for another few minutes, stir regularly to ensure that the garlic doesn’t burn and become acrid.
Once the onion and garlic are softened and smelling delicious, add the potato and celeriac to the pot, along with the mug of stock and bay leaves. With the water from the kettle, top the pot up so that the veggies are mostly covered (make sure that you have some decent ‘islands’ of celeriac poking through the top – you can always thin the soup down later). Add a pinch of salt and bring the whole thing to a boil. Once boiling, allow to simmer on a low heat with the lid on for 25-30 minutes, or until the veggies are soft.
Remove the bay leaves and blend the soup until smooth. Add more water at this point if the soup is too thick. Stir in the crème fraiche and tarragon if using, and season to taste with a little more salt if needed, and white or black pepper.
For an extra smoked garlic kick, serve the soup with the following bready things:
Smoked garlic croutons or
Make garlic bread by mashing a smoked garlic clove into butter, or
Roast a few cloves of smoked garlic whole (drizzle with olive oil) and squash them into some crostini.
With thanks to Kerstin Rodgers and Xanthe Clay for suggesting these ideas over Twitter.

Thursday, 20 December 2012

Chestnut, mushroom & onion pie

Recipe adapted from ukshallot.com

If the world doesn’t end tomorrow, I recommend that you try this out at some point. I think it might be, along with the sausage and apple hot pot one of the most grown-up things I have ever made. It is rich and perfect for winter, one of those vegetarian recipes that really does tick all the ‘depth of flavour’ boxes. Also, as it only uses a small amount of wine – you can drink the rest! If wine isn’t really your thing, I recently discovered that Sainsburys are selling mini bottles of wine, 3 for £5. This is great for if you want to cook with wine but not necessarily open a whole bottle, or just really don’t want to drink a whole bottle.

I know that most of the time I come across as quite a confident cook, but in reality I’m really not. In theory I know how to make most things because I watch so much cooking television, but no matter how many hours of ‘Great British Bake Off’, I still can’t pluck up the courage to make my own bread or pastry. It’s weird really because cake and macaroons hold no fear for me. I think that I just don’t trust/understand the alchemy that is yeast, and have nightmares about the dreaded ‘soggy bottom.’ I’m a bit of a scaredy-cat really – I stopped riding my bike aged seven because I didn’t like how it went faster going downhill, and don’t even get me started on ice skating or cable-cars. What this means, is that in terms of baking, my fear of pastry even spread to the ready-made frozen stuff, and this was in fact the first time I have used it. Now I don’t normally own up to this sort of thing, but I feel that I need to tell you, because the photograph of the little pies doesn’t look so brilliant. It’s all a learning curve I suppose, and they tasted amazing anyway.


Ingredients (makes enough for 6-8 small pies, 1 big one or a stew for approx. 4 people)

200g cooked chestnuts (such as Merchant Gourmet vacuum packed)

2 bay leaves

1 sprig fresh rosemary

200ml red wine

300ml vegetable stock

25g butter (I don’t normally cook with butter, but it really makes this dish - can use vegan margarine)

1tbsp olive oil

12 shallots or baby onions, peeled & cut in half

400g chestnut mushrooms, cut into quarters

2 tbsp Beurre Manie (1 tbsp flour mixed to a paste with 1 tbsp softened butter/marg– I used a microwave to help this process)

2 tsp (not heaped) Dijon mustard

2 tbsp flat leaf parsley, finely chopped

Salt and freshly ground black pepper

2 sheets of puff pastry (some ready made pastry in supermarkets is actually vegan)


Method

Melt the butter in a frying pan, add the olive oil to stop it burning and fry the onions until slightly browned, about 5 minutes. Add the mushrooms, bay leaves and rosemary and cook for a further 4-5 minutes.  

Add the chestnuts, red wine and vegetable stock. Bring to the boil and simmer for 20-30 minutes until the onions are soft, stirring occasionally.
Add the beurre manie, stirring constantly until is dissolves, and cook for a further 5 minutes until the sauce is thickened.

Stir in the mustard and flat leaf parsley and season to taste with salt and freshly ground black pepper.

If serving this as a stew, you can serve it immediately or reheat – it reheats really well, but does get a little too thick if left on a low heat for a long period of time.

If making this into pastry, let the mixture cool down completely (information I know thanks to the ‘wellington’ challenge on Great British Bake Off). I tried some small squares of pastry into triangles, and some larger rectangles of pastry into squares. Whatever shape you do, you will get about 4 from each sheet of pastry.

Dollop a spoonful of the mushroom mixture into the pastry, being careful not to go to the edges (I failed). Fold the pastry over carefully to create your desired shape, and crimp the edges closed with a fork.

Brush the pastries with a little milk and bake in a pre-heated oven (180-200c) for roughly 25 minutes or until puffed and golden.


not the prettiest, but tasted amazing

Thursday, 29 November 2012

Celeriac Sofrito


I first tasted this dish a few weeks ago when I volunteered, together with Moishe House and Brondesbury Park Synagogue at Rumi’s Kitchen, in Cricklewood Mosque. About once a month, a group of people come together and cook for the homeless. What’s wonderful about it, is that it isn’t so much about the food, but about creating a sense of community. Much love to Becky for introducing them to me. See below* for details about Rumi’s Cave.

I had never worked in an industrial-sized kitchen before, and absolutely loved it. The pot I was stirring was so big that it went over four rings on the hob, and the heat was so intense that two of us were stirring together to keep the celeriac from sticking. The original recipe was chosen by someone from the synagogue, it is an Ottolenghi dish, served with oniony meatballs. This recipe here is my adaptation.

In Jerusalem, Ottolenghi/ Tamimi explain that a sofrtio has its origins in Sephardic Jewish cooking, and refers a cooking method. Originating from the Spanish verb sofreir (to fry lightly). It involves slowly cooking meat in a pot on the stovetop with only oil and very little liquid. The result is a very tender texture and rich, comforting flavour. Turmeric, garlic and lemon are traditional flavours for this. Although traditionally associated with meat, it works incredibly well here with just veggies.

Celeriac is a pretty new ingredient for me. I have never been the biggest fan of root vegetables, but celeriac is brilliant. Every day on Masterchef Professionals someone seems to be making celeriac puree, so it can’t just be me. I have made this recipe a few times now, and I really love it. It’s sunshine-yellow and lemony, and the spices add an incredible warmth. I’ve added a few potatoes for a little variety in texture – the celeriac becomes really soft and almost creamy.

Makes enough for 4-6 as a side dish.

Ingredients
2 tbsp olive oil
1 celeriac, peeled and cut into approx 5cm x 1.5cm batons. I intentionally cut some a little small and some a little big, for different textures.
About 8 small waxy potatoes (I use charlottes) cut into quarters
2 garlic cloves, peeled and crushed
1 tsp ground turmeric
½ tsp each cumin and coriander
1 tsp fennel seeds, lightly crushed
¾ tsp smoked paprika
1 mug-full of chicken or vegetable stock (1 cube) – you may need a little extra liquid
Juice from half a lemon – more of less depending on your preferences
Salt and freshly ground black pepper

The potatoes take a little longer to cook, so start them off cooking before you peel and chop the celeriac. Heat the oil in a large saucepan/or deep frying pan and add the potatoes, stirring quite frequently on a medium heat. Add the celeriac when it is ready, along with the turmeric, fennel seeds and other spices. Fry these all together for 5-10 minutes, until the spices start smelling fragrant and the veggies look cooked at the edges. Add the garlic and fry for another 5 minutes, stirring all the time to prevent it from burning. Then add the mug of stock, and simmer for at least 20 minutes. As there isn’t that much liquid, you will need to stir quite regularly to prevent it from sticking to the bottom (you may need to add a little more liquid, but don’t add too much).  When the potato quarters have cooked through and the smaller wedges of celeriac have started to disintegrate and thicken the sauce, season with the lemon, salt and pepper. Goes very well with thick Greek yogurt or Labneh.

8 celeriacs cooking in the giant pot at Rumi's Kitchen
Another volunteer and I stirring the giant pot. I love my apron 
my normal-sized version - slightly too orange as my hand slipped with the paprika - tasted nice though

Served with herby labneh and pomegranate seeds

*Rumi’s Cave is a community space located in the heart of Kilburn in London. It is run by charity, Ulfa Aid as a way of engaging and reaching out to the community. At Rumi’s Cave, we aim to create an environment of spirituality, creativity and learning for everyone, despite race or religion. Their mission is: Spirituality, Creativity, Education, Community, Charity.


Sunday, 25 November 2012

Dark chocolate peanut butter cups


I think I could probably write an entire cookbook based on recipes using peanut butter – seeing how much I get through, maybe Skippy will sponsor one. My love for peanut butter cups, and probably peanut as ‘sweet’ comes from my first trip to New York as a conscious foodie aged 14 (all I remember from my trip at the age of 4 is getting soaked by my cousin Josh at a water fountain outside the Smithsonian). Reese’s Peanut Butter cups completely changed my world. Coming home from that trip my suitcase basically consisted of peanut butter cups, some variations on the theme including cookie and grape jelly, and a pair of Steve Madden platforms. Well I guess that’s what happens when a 14 year old is in the US without parental supervision. Speaking of foodie consciousness by the way, this trip was also the first time that I tried, and fell in love with, both sushi and aubergines (I had been afraid of them previously). It also put an end of my refusal to eat red meat. Much much love to all my American family for contributing to this enlightenment.

These peanut butter cups were another one of the chocolates made with T.O.M on our chocolate day a few weeks ago. The original recipe comes from Nigella Lawson’s How to be a Domestic Goddess, which I think I count as my favourite book just because of the title. See evidence of me getting carried away with being a ‘domestic goddess’ here. T.O.M and I have made this before in its original state, the peanut butter square, but this time on our chocolate day we were feeling a little more ambitious.

When I told a colleague that I was planning on making peanut butter cups, her response was ‘you know that you can get them in the shops right’? Obviously it takes a little more time to paint the cupcake cases with melted chocolate, but it really is worth it. The dark chocolate gives them a bitterness that is a perfect foil for the sweetness of the peanut filling, and makes them feel a little more grown-up, and different from Reese’s. See my post on honeycomb-peanut chocolate bites (also Nigella) for some thoughts on why salty peanut goes so well with chocolate.

Makes about 15 cups, more or less depending on how big you make them, obviously. T.O.M and I made a double batch, from which we made about 18 cups and a big rectangle of chocolate peanut butter squares.

Big thanks again to Steven for the tremendous photos

Ingredients

       50g muscovado sugar
       200g icing sugar
       50g unsalted butter or vegan margarine - softened
       200g peanut butter – crunchy or smooth depending on preference
       Make sure that you have about 400g of dark chocolate, although you probably wont need all of it.
       Cupcake cases

First make the chocolate cases. Melting chocolate can be very temperamental, so I tend not to melt more than 50-100g at a time. Either use the microwave or a bowl suspended over a pan of simmering water making sure that no steam or condensation makes its way into the chocolate, or it will seize. Using a teaspoon (or a clean paintbrush) coat the base of the cupcake case with melted chocolate, carefully working the chocolate up the sides to about a third of the way up. Set the cases aside to firm up.

In a large bowl, mix together the sugars, butter and peanut butter together. I know it seems like a scary list of ingredients, but trust me it works – the muscavado sugar gives a brilliant sandy texture. Use a food processor for this if you want, it is not the easiest thing to mix by hand.

When the chocolate cases are hardened, take a small handfuls of the peanut mixture, roll it into flat-ish circles using your hands, and press them into the cases. Make sure that the peanut doesn’t come up higher than the edge of the chocolate, otherwise there will be gaps and cracks in the finished cups.

When this is done, melt a little more chocolate to cover over the tops. Make sure that the chocolate is completely hardened before turning them out of the paper cases – but don’t put them in the fridge.


Monday, 5 November 2012

White Chocolate Mendiants with Fennel Leaf and Pink Peppercorns


These are I think the most beautiful things I have ever made, and would make an excellent gift for Christmas or Chanukah. Apart from my love of Hundertwasser (backgrounds here and on Twitter), my favourite form of visual art is Japanese landscapes paintings, especially Edo Period. I actually own an original Hiroshige print, probably my most prized possession. I can (and do) stare at it for hours feeling all happy and serene. These little chocolates look just like Japanese Cherry Blossom paintings, and as soon as I saw a photo of them I completely fell in love – the way you would if you saw your favourite kind of art reproduced in chocolate (unless you are a big fan of Damien Hirst, or potentially any of the YBAs actually).

Every so often, although not often enough, T.O.M and I get together and have a chocolate baking day. And we are getting pretty good at it. We always buy twice as much chocolate as we need, but nowadays we don’t seize any, we just eat all the leftovers. For the past few months I had been incubating in my brain some sort of thing involving pink peppercorns and white chocolate. I couldn’t quite work it out, but I knew that it had to be something spectacular. Conveniently I had given T.O.M a bag of pink peppercorns recently and so everything just fell into place. I found this recipe via Google, and as soon as I saw this one, I knew I had to make it. It is an El Bulli recipe, and I found it here.

Mendiants isn’t exactly the right kind of name for these, but I needed to find something better to call them other than ‘thingies’. (From Wikipedia) A Mendiant is a traditional French confection composed of a chocolate disk studded with nuts and dried fruits, representing the four monastic orders of Dominicans (raisins), Augustinians (hazelnut), Franciscans (fig) and Carmelites (almonds). Not really the most interesting thing I have ever written on here – but I’m sure it will come up in a pub quiz or on University Challenge or something. Answers on a postcard, or comment below, about what Saint, or saintly figure these could represent.

Ingredients

You will need some fennel fronds from the top of a fennel bulb. We had to go through an entire box of them in Sainsburys to find one which hadn’t been completely trimmed, and then ended up cheekily picking leaves off other ones and putting them in the same bag.

With the peppercorns, they need to be lose and not in a grinder – you only want the pink outer layer – the centre is black and not as pretty.

With regards to the white chocolate, the Green and Blacks one is very good as it has tiny flecks of black vanilla running all the way through it. It is pretty pricey though – we used a third Green and Blacks and two thirds Sainsburys own brand, and it seemed to work very well.

You will need lots of greaseproof or baking paper, a chopping board or other flat thing, and a flat bottomed glass.

In order to make these beauties, first carefully clean and check the fennel fronds – be careful as they are really delicate. Carefully remove any squashed leaves, dirt and caterpillars. Once dry, pick off miniature tree-shaped fronds and arrange them on a sheet of greaseproof paper that has been wrapped around a chopping board or something. Leave quite a lot of space between them. This is a fiddly job, but the whole point of these is how they look, so do take the time to do it carefully. Its pretty therapeutic actually.

Once the fennel leaves are in place, arrange a few flakes of pink peppercorn over each one, trying if possible to get them in the ‘branches’.

Carefully melt the chocolate using a bain-marie or microwave of you are feeling confident, and using a spoon put a blob over each fennel leaf-peppercorn arrangement. Take care when doing this, and don’t do it from a height – you need to make sure that the arrangement doesn’t get distorted or crushed by the chocolate.

Once this is done, place a second sheet of paper over the chocolates, and use the glass to gently press each one into a flat circular disk, encasing the fennel-leaf and pepper flakes into the chocolate ‘like a fossil’. Leave to set, using the fridge only if you have to.

And there you have it. So easy and so beautiful. I’m thinking of other variations of this – potentially with tarragon. Or maybe in keeping with the colour theme, some flakes of pink Himalayan salt.

With much love and thanks to T.O.M, and to Steven for being completely lovely whilst being thrown out of his own kitchen, and taking these incredible photos.


this photo taken by Claudie