an adventure into my cookbook collection: soul-searching, doing things differently & the truths I learn along the way...

deseeding pomegranates is feminine & erotic, unless you hit them with a wooden spoon...

urm..?

Saturday 28 December 2013

Mayan style toasted pumpkin seed dip


Hello you lovely people! I hope you that you had a wonderful break, however you choose to mark the season (if at all). I marked it by getting a year older, eating a delicious salt-caramel chocolate torte from Babkalicious and attending Limmud conference and learning a lot of new things.

I am one of those weird people who gets oddly excited about kitchen utensils, the bigger the better. My favourite Selfridges window is the one with the display of giant saucepans, and I have confused many people by stopping in my tracks to gaze longingly at it. The flat I am currently living in contains one of the largest frying pans I have ever had the privilege to be able to use, and as soon as I saw it my mind just started fizzing with new recipes to try. It is the perfect size and shape to toast a ton of pumpkin seeds, and so this recipe just had to be made (I get inspired by normal things too, like sunsets and art, I’m not a complete lunatic).

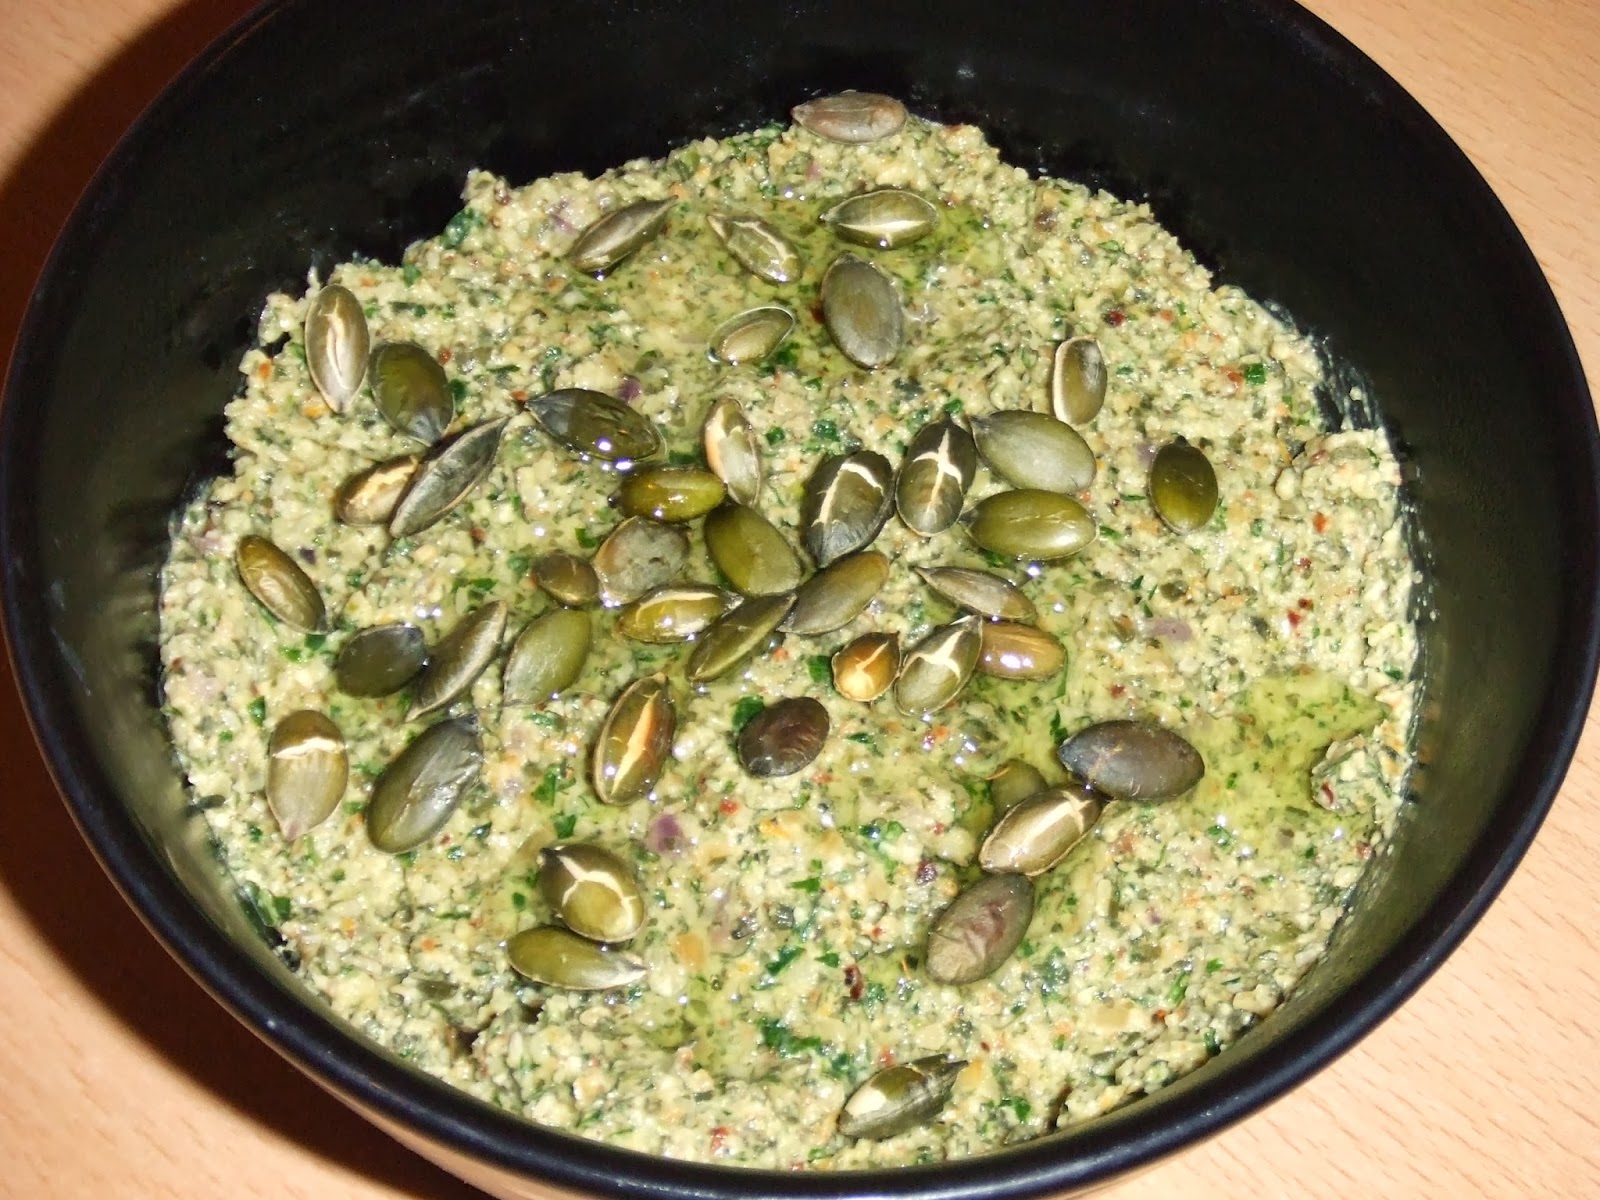
This dip is absolutely delicious, it is simple and just works in that way that ancient and authentic recipes do: toasty, wholesome, citrus-fresh and ever-so-slightly bitter. Toasting pumpkin seeds transforms them in the most wonderful way. They become crunchy and fragrant, with a complex roasted nutty flavour.

The quantities given here make enough for a smallish bowlful, or rather, enough as part of a Mexican/South American mezze-style dip selection for about 6 people. The original recipe uses a food processor, but I decided to use my mortar and pestle, and then an immersion blender. This probably kept the texture a bit rougher, which I liked, and was less complicated for washing-up purposes. But really, I just love using my mortar and pestle – it is rough stone and heavy, and makes me feel a bit more authentic.

Ingredients:

1 cup plus 1 tbsp pumpkin seeds
2 tbsp olive oil
½ onion, finely diced (or use a whole one if it is small)
1 jalapeño, seeds and white pith removed, and finely diced
2 cloves of garlic, crushed
Small handful fresh parsley (equivalent to about 1/3 cup)
Small handful fresh coriander leaves
2 tbsp fresh lime juice
zest of half an orange
salt

Serve: with tortilla chips, crudités, warmed soft tortillas and other South American delicious dippy things like salsa, guacamole, and sour cream.

Method:

Heat a large frying pan and toast the pumpkin seeds in a single layer (no oil), tossing occasionally, until they crackle and pop. Some will jump out of the pan in an over-excited kind of way. You may need to do this in stages if your pan isn’t big enough.  

Saving a few of the seeds for garnish, grind the rest to powder in a pestle and mortar and add to a large bowl. You will definitely need to grind them in stages.

Heat 1 tbsp of the olive oil in the frying pan, add the diced onion and jalapeño, and fry over a medium heat, stirring occasionally. Once it starts getting a little softened and translucent, add the garlic and fry for a few minutes more, and then add to the bowl with the pumpkin seed powder.

Add the parsley, coriander, lime juice, orange zest, 1 tbsp olive oil, pinch of salt, and 1/3 cup of water to the bowl with the ground pumpkin seeds and fried things, and use an immersion blender to puree everything together to a rough, humous-like texture. Taste and add a little more salt if needed.

Serve at room temperature, scattered with the reserved toasted pumpkin seeds and a little drizzle of olive oil.

Sunday 15 December 2013

Celeriac, potato and smoked salmon gratin


Adapted from a recipe I found somewhere on the internet

Aah celeriac, the Ood of the vegetable world.

This is a new discovery of mine, and I am really excited about it. It is seasonal, rich, creamy and really easy. The recipe is a bit like a cross between a gratin dauphinois and a posh Janssons Temptation - one of the best named dishes of all time ever. Who doesn’t love a bit of temptation? I guess this one could be a Dauphin’s Temptation or something. Whatever it is, its really tasty.

I have tinkered with the recipe quite a bit. When I made this the first time there was enough potato, celeriac, onion and salmon for one and a half gratins, but not enough cream. I guess most people don’t really mind if there is a bit of smoked salmon left over either. I have reduced some of the quantities to what I think would make a decent bake for 6 people, in one dish, but there still will probably be a little bit of celeriac left over – it is hard to reduce the amount of celeriac as they a are all pretty huge.

The original recipe used dill, but I actually really dislike dill, and made it instead with a bit of thyme and lemon thyme from my parents’ garden. It gave it a really interesting flavour, much less dominant than dill.

Serves 6

1 pack smoked salmon (120 – 150g, pack-sizes don’t seem to be uniform across most stores, so you might have some leftover)
1 large or 2 medium baking potatoes, peeled and thinly sliced
1 celeriac (not too enormous) peeled, quartered and thinly sliced. (Put the sliced in a bowl of water with some lemon juice in to stop them discolouring)
300ml double cream
About half an onion, diced
Few sprigs of lemon thyme, or a mixture of lemon thyme and regular thyme
Salt and pepper

Preheat the oven to 180 c (with fan).

This dish is all about the layers. You will need a large ovenproof dish.

Layer 1: overlapping slices of potato and celeriac.
Layer 2: smoked salmon – just a few slices, it doesn’t need to covering the whole layer
Layer 3: sprinkle with diced onion and a little lemon thyme, season with salt and pepper, and pour over a little cream

Repeat layers 1 to 3.

Layer 7: Cover with a final layer of potato and celeriac, and pour the rest of the cream over the top.

Add a final decorative sprinkling of thyme and a bit of salt and pepper. Cover with foil and bake in the oven for 45 minutes, remove the foil and bake for another 30-40 minutes until golden and bubbling.

Serve with a big green salad, with dark green and bitter leaves.

Unfortunately I only have a photo of the gratin unbaked, because I was too distracted by eating it when it came out of the oven


Sunday 8 December 2013

Puy lentils with cherries, spinach and blue cheese


This is another recipe adapted from the fantastic Ottolenghi cookbook. I have cooked more from this book than any other cookbook I own.

Lentils, cherries and blue cheese might sound like a bit of an odd combination, but it really works. I first made this dish mainly because I was curious as to how the flavours would work together and had all the ingredients to hand, and I was completely blown away by how yummy it was. Sweet, salty and rich, it would make a lovely starter for a seasonal posh dinner, or a really fabulous lunch.

Serves 2, 4 if serving as a starter

Ingredients:
125g puy lentils, or 1 can of ready cooked
2-3 shallots, or half a small onion, finely chopped
2 tbsp olive oil
3 tbsp water
1 tsp caster sugar
60g dried cherries (I used dried morello cherries)
50ml red wine vinegar
80g fresh spinach
About 120g blue cheese (it is a strong flavour so just add as much as you fancy. The recipe specifies gorgonzola, but I used blue stilton)
Salt and black pepper

If you need to cook the lentils, wash them and then boil them in a lot of water with a couple of bay leaves for about 20 minutes, until they are cooked but al dente.

To make the sauce, heat the olive oil in a saucepan, add the shallots and sauté over a low heat for about 10 minutes, until softened and golden. Add the water, sugar, cherries and vinegar, and simmer for another 10 minutes.

Drain the lentils (either from saucepan or can) and add them to the cherry sauce, stir, and if using ready cooked lentils, warm them up in the sauce. Add the spinach and keep the heat on until it wilts. Taste and season with salt and pepper (not too much salt as the cheese is quite salty).

Serve warm or at room temperature, with a little raw spinach and the blue cheese crumbled over the top.


Tuesday 3 December 2013

Little orange fairy cakes


I had been planning on making orange and passion fruit cupcakes, but I realised a little too late that the seal had gone on my jar of passion fruit curd, and it had gone a bit fizzy. In a way though, I’m glad. I probably would not have set out to make plain orange fairy cakes, but actually, they were brilliant, and by sticking to one strong flavour, they really worked. I am the kind of person that always ends up over-complicating things. Always done with the best of intentions, sometimes I just can’t leave things alone, and quite often it ends up a mess. One of my intentions for the year is to keep things simple. I wish someone would say this to the contestants on Masterchef Professionals before someone else puts black olives in a dessert, or clay on a potato.

These cakes will turn out a lot better if you use a proper fairy cake/cupcake pan, as opposed to just jamming filled cupcake cases on a flat baking tray.


 Makes, annoyingly, 26 – don’t just jam all the mix into 24 cases, as they will be too full and you risk creating mushroom cloud cupcakes.

For the fairy cakes:
250g unsalted butter, softened
250g self-raising flour
225g caster sugar
4 eggs
pinch salt
zest of 1 big orange
3 tbsp orange juice
2 tbsp milk

For the orange buttercream:
250g unsalted butter, softened
200g icing sugar
2 tbsp orange juice
zest of 1 lemon

toppings:
Crushed pistachio nuts
Pieces of crystallised ginger
Dried cranberries

180c with fan, 16 minutes

Cream together the butter and sugar, and then add the flour, eggs and salt. Mix together until a thick batter forms – this could be done in a food processor. Add the orange zest and juice, mix well and then add the milk and mix again. Add a little more milk if the batter still seems too thick. It should have a 'nice dropping consistency', ie. plop nicely off the teaspoon into the cupcake case. At this point you could throw in a handful of sultanas or dried cranberries if you wanted to.

Use a teaspoon to fill your cupcake cases no more than two thirds full and bake for 15-20 minutes, until risen and golden on the top (with my oven this took 16 minutes).


 Lift the cakes out of the tray as soon as possible and let them cool on a cooling rack.

Make the buttercream by beating together the butter, icing sugar and zest, and then gradually incorporating the orange juice (make sure the butter is really soft otherwise it will go lumpy). Use a piping bag or a knife to spread the icing over the fairy cakes – you want it to be thick, but not insanely so – the cake has a lovely light texture and orange flavour, and you don't want to overpower it.

Decorate the cakes with crushed pistachios, crystallised ginger, dried cranberries, or whatever else you fancy. Once the cupcakes are iced, put them in the fridge for a few hours to harden up the icing.


Saturday 23 November 2013

Blackberry and black pepper vinaigrette


Picking blackberries off brambles is one of the best things about the end of the summer. My family always try to pick as many as possible, and keep them in the freezer for berry treats throughout the winter.

This vinaigrette is a perfect vehicle for frozen berries. Freezing seems to sweeten them, and they are so soft once defrosted that you don’t need to cook them down at all.

This quantity makes enough for one massive salad, or a few smaller ones.

1 cup frozen blackberries (or use fresh if available)
1 tsp grain mustard
1 tsp honey (or agave nectar, or maple syrup)
1 clove garlic, crushed
2 tbsp balsamic vinegar
3 tbsp rapeseed oil
salt and lots of freshly ground black pepper

Defrost the blackberries and mash them with a fork. If they are still too lumpy you can use a hand-blender to wiz them up, but it shouldn’t be necessary. A lot of other recipes blend the dressing, giving a uniform purple sauce. I quite like keeping things a bit more rustic though – my way the colour stays darker, and the odd escaped lump of blackberry is always welcome.

Mix the blackberry mush with the mustard, honey, garlic, oil and vinegar. Taste and season with a little salt and a lot of black pepper.

I suppose you could add a bit of fresh tarragon or fresh mint to make it a bit more complex and grown-up if you wanted to.

I used this dressing on a salad of spinach, red onions, puy lentils, goats cheese and pistachios, and it was really good.

Wednesday 20 November 2013

How to make brussel sprouts amazing


I have got to thank Alli for introducing me to this, and adding a new vegetable to my diet.

Before I was introduced to the concept of roasting brussel sprouts like this, I genuinely couldn’t see the point of them, other than wrapping them in empty Ferrero Rocher wrappers and then giving them to annoying people. I also couldn’t understand why everyone seemed to be eating them at this time of year when no-one seems to like them.

Brussel sprouts
Olive oil
Salt – preferably coarsely ground sea salt

Pre-heat the oven to 200 degrees centigrade.

Prepare the sprouts but cutting off a bit of the base and then peeling away their leaves until they look clean and a lot less manky.


Slice the sprouts in half through the base. Put them on a baking sheet or roasting dish (in a single layer), toss them with a glug of olive oil and sprinkle with salt.

Roast for 15-20 minutes giving the tray a bit of a shake halfway through. When ready they will be brown and crunchy in places, sweet, juicy and unbelievably delicious.


 Serve the sprouts as a side dish, or add them to other roasted veggies to make a warm salad.

Roasted butternut squash and brussel sprout salad with red onion, spinach and toasted pumpkin seeds

You could also fry them with lots of butter and chestnuts, which is very nice too.


Sunday 17 November 2013

Egg stuffed tomatoes


Egg stuffed tomato – sounds so obvious as soon as you say it out loud. This is a really delicious breakfast or brunch dish, and would be perfect if you were cooking for a lot of people as it isn’t much prep and is no-where near as ‘hands-on’ as most other kinds of breakfasty eggs.

This recipe is from The Vintage Tea Party Book by Angel Adoree, which I described in Interlude number 2 – the cookbooks. This isn’t the one I describe as thigh-quiveringly sensual, but it was very good – in more of a well-behaved Sunday brunch-y kind of way. 

Ingredients

1 large beef tomato per person
1 medium egg per person
1 tsp of your choice of filling – whatever you want really, or happen to find in the fridge. It could be: cheese, crème fraîche, pesto, chill sauce, leftover ratatouille, or even a couple of anchovy fillets.
Salt and pepper.

Preheat the oven to 200 c.

Using a sharp knife (serrated is easier for tomatoes), cut a little bit of skin of the base of each tomato so that it sits flat. Then cut the top off, creating a lid that will be used for cooking. Scoop out the seeds and middle part of the tomato flesh, creating a large well. Be careful not to go through the base.

Spoon in your choice of filling (I went for pesto, plus a little cheese on top of the egg), and then crack an egg in. Season the egg with salt and pepper, and balance the tomato lid back on top. Place the stuffed tomatoes in a lightly oiled roasting dish and cook for about 20 -25 minutes, until the white is set and the yolk is warm and runny – or however you like it.


Wednesday 6 November 2013

Roasted peppers with tomato, anchovy and garlic

I recently went on a kosher Italian cooking course. In Italy. With my Mum. I’m sure that most of us feel pretty accustomed to what we think of as Italian food, but really it is just scratching the surface. What astounded me so much with the food we cooked, and the food we ate over that marvellous week in Umbria, was how such massive, gutsy flavours could be brought out of a few, simple ingredients. All it took was a little olive oil and salt, and a sense of respect, time and place. And probably a little love. The course was run by Silvia Nacamulli, and I highly recommend it. For information on the Italy trip and the classes Silvia runs in London, see her website.

Making pasta at Sismano's Castle, Umbria
I learnt some great techniques and some new flavour combinations during the trip and over the coming few weeks I will be posting some recipes inspired from my time in Italy. This roasted pepper recipe was in my repertoire already (via Delia Smith and my Mum), but it certainly fits of the theme of the trip – simple ingredients, olive oil and salt, and big flavours. Make these for a starter, light meal with salad and crusty bread, or as part of an antipasti, and the flavours will knock your socks off.

Serve approx 1 pepper per person as a starter, scale up as needed. Don’t worry about making too much, they will definitely all get eaten.


Ingredients:

Red peppers (My Mum uses the pointy peppers, and while they are definitely a bit sweeter, they don’t hold the other ingredients quite as snugly, which I think really helps with the cooking.)
Smallish tomatoes - not as small as cherry tomatoes, I use medium sized vine tomatoes. Approx 1 and a half per pepper
Sliced garlic – approx 2 slices per pepper half
Anchovies (the kind that come in tins or jars) 1 per pepper half
Olive oil
Freshly ground black pepper

Preheat the oven to 180 C

Cut the peppers in half, through the stalk if possible (it looks prettier).


Carefully remove all seeds and white pithy bits, and arrange the pepper halves on an oven tray. Quarter the tomatoes and put two or three tomatoes into the middle of each pepper half. Add a couple of slices of garlic to the pepper halves, and one anchovy fillet. Pour approx half a teaspoon of olive oil into the centre of each pepper, and drizzle a little more over the tops (this is considerably less oil than in the original recipe).

Season with peppers with pepper (there is enough salt in the anchovy) and put them in the oven for about 45 minutes. It will smell amazing when they are ready, and the peppers will be soft and sweet, and a little blackened around the edges.


Enjoy!!


Sunday 20 October 2013

Renghan Reveya: Aubergines stuffed with a peanut masala


In my previous post I mentioned my new Indian vegetarian (Gujarati) cookbook Prashad by Kaushy Patel, and this is my first attempt at one of its recipes. This aubergine dish is one of my favourite curries, and I have always been interested in learning how to make it. When I saw the beautiful stripy aubergines at Queens Park Farmers’ Market, I knew it had to be done. Of course once it is cooked you can’t tell that the aubergines ever looked like anything other than normal aubergines, but I just can’t help myself when it comes to buying interestingly coloured produce (I also bought a purple kohlrabi).

I didn’t have quite the right ingredients to make the exact recipe, so here is my attempt. Apologies for the lack of post-cooking photo, it was so unbelievably delicious that I got distracted. Seriously, it was just as good as the versions I have had in Indian restaurants, and I highly recommend it.

I had previously seen other versions of this curry that used desiccated coconut, so I thought that coconut oil would make a nice change instead of using regular oil. I have also reduced the amount of oil and sugar. The original recipe was onion and garlic free, using ¼ tsp asafoetida instead, but seeing as I didn’t have any, I thought I would use onion and garlic, especially as I didn’t have enough aubergines.

Serves 4 as part of a bigger meal with other dishes, or 2 hungry people with a little leftover if just served with rice and/or bread (I prefer chapattis to naan bread).

Ingredients:

150g peanuts, roughly chopped (you are supposed to use unroasted red-skinned peanuts, but I couldn’t get hold of any so I used roasted, salted ones. Apparently Sainsburys are having some sort of nut crisis).
15g Demerara/soft brown sugar or flaked jaggery
2 tbsp coriander seeds (or 3 tbsp ground coriander)
2 tsp turmeric
1 ¼ tsp salt (use less if you are using salted peanuts)
1 heaped tsp cumin seeds
½ can chopped tomatoes
4cm root ginger, peeled and roughly chopped
2 cloves garlic, squashed with the flat edge of a knife and roughly chopped
2-3 tsp mild chilli powder, or 1-2 tsp hot chilli powder
2 handfuls fresh coriander, chopped
100ml coconut oil (In the winter the oil with be solid, and I have found the best way to melt it so that you can measure it without wasting any, is to submerge the whole jar in a bowl of hot water for a few minutes)
Little aubergines – the original recipe called for 16 baby aubergines (aw babies), but I only had 5 slightly bigger ones. This wasn’t enough, so I would suggest using 16 babies if you can get them, or 8 teenagers.
1 medium sized onion – cut in half and sliced

Method:

Put the peanuts and coriander seeds in a mortar and pestle and grind until it is all broken down and resembles a coarse powder/crumbs (I use a really heavy stone one, and I definitely recommend getting one). 

Put the crumbs into a large bowl with the sugar, turmeric, salt, cumin seeds and tomato, mix together and leave to rest for a few minutes.

Crush the ginger and garlic in the mortar and pestle, and add it to the peanut spice mixture along with the chilli powder, chopped coriander and coconut oil. Stir it all up.

If you are using onions, heat oil in a large saucepan and put them on to fry on a medium-ish heat at this point. Stir from time to time, but allow them to colour.

Using a very sharp knife, carefully cut the aubergines into quarters lengthways, leaving a couple of centimetres at the stem so that they stay together. Gently open them out and use a teaspoon to fill them with the spice mixture, coating all four wedges of each aubergine, being careful not to split the aubergines apart. This is a really messy job, and the spice mixture will go everywhere, so it is probably best to hold the aubergines over the bowl of marinade.

Arrange the filled aubergines in the pan on top of the onions, and cover with any remaining spicy marinade – there should be a fair amount. Cover the pan and cook over a low heat for 5 minutes, and then add in 350ml boiling water – carefully around the edges so that it doesn’t wash the spice mixture out of the aubergines. Put the lid back on the pan and bring to the boil, reduce the heat and let the whole thing simmer for 25-30 minutes, until the aubergines are tender. If you are using slightly bigger ones, check the pot a few times to gently turn the aubergines.

If like me, you don’t have quite enough aubergines and a bit too much liquid, throw a handful of rice into the pot for the last 10 minutes of cooking time. The rice will cook in the delicious curry sauce, and absorb the excess liquid.

Kaushy Patel suggests that you let the dish rest off the heat for 20 minutes after it is done cooking, and then reheat before serving – to let the flavours infuse even more. I tried, but after about 5 minutes off the heat it smelt too good so I ate it straight away.


Tuesday 8 October 2013

Interlude number 3 - Some more cookbooks


Its my 100th post!!

Probably for the last ten posts on this blog I have been counting, from 90 right until now, my 100th blog post. And of course people kept asking what I will do when I reach 100, how will I mark that momentous occasion? And here it is. No fanfare, no fireworks, just me talking about food. I suppose it is a fantastic achievement, but nothing really has changed. I’m still the same person, buying too many cookbooks and not actually cooking as much as I should be. Don’t worry though – I’m not going to get all reflective on you, I did enough of that a few posts back after Jewish New Year.

I really do buy too many cookbooks, and so it is probably time for another cookbook interlude, where I can tell you about a few of my exciting new purchases.

All of my favourite cookbooks seem to have a playing card in them, but I’m not going to tell you why.

Bake a Boo Bakery Cookbook – Zoe Berkeley

The Bake a Boo bakery is in Mill Lane in West Hampstead, and the baker/author of this book is gluten and dairy free, making this a very interesting baking book. The bakery also offers gluten and dairy-free afternoon teas. The book is full of really lovely recipes and is a really useful resource if you, like me, have a lot of friends with dietary restrictions. As well as gluten and dairy, there are also recipes that are sugar and egg free, as well as some that are full of all the things cakes are supposed to be full of, for ‘normal’ people. I am moving to West Hampstead pretty soon (woohoo) and really looking forward to visiting this bakery.

The scone recipe is sugar free and looks very similar to my Grandmother’s, which is always a good sign. Because of all the cream and jam, scones don’t actually need any sugar – apart from the odd raisin. And they will probably be the first thing that I make from this book (I am having trouble perfecting my scones). Other recipes that look really good include a pear and custard slice, Florentines, elderflower tea loaf, a vegan chocolate hazelnut cake, and a gluten-free passion fruit cake.


Prashad Indian Vegetarian Cooking– Kaushy Patel

Prashad is an Indian restaurant in Bradford, that came to prominence when it won Gordon Ramsey’s Best Restaurant TV show in 2010. It is a really lovely book – even the paper feels really nice. They are also really fantastic tweeters, an attribute I have recently come to really admire. The first time I flicked through this book, I got so excited that I did a little dance and probably squeaked quite a bit. I have many Indian cookbooks, but the reason why this one made me so happy was because it was the right kind of Indian - Gujarati. Kaushy Patel is from Surat in Northern India, the same region as the owners of the Indian restaurant of my childhood, and still probably my favourite – Rams in Kenton.  (Other favourites are Shayona and Pradips and anywhere on Drummond Street). This book contains all of the recipes of my favourite dishes, ones I have been searching for in other books for years.

A lot of recipes are vegan, wheat-free, or onion and garlic free, and so this is also a very useful book for those with dietary restrictions. The book also has a really handy selection of practical points and tips, with really excellent advice like:

‘Try not to cook when you are stressed or short on time – cooking should be a pleasure as well as a means to an end. And always think beautiful thoughts when you cook. Not only will it make you feel happier, but it will make your food taste beautiful too!’

Other handy hints in the book include tips on how how to stop aubergine from oxidising, or stop your dhal pan from foaming over.

The book has an incredible selection starters and Indian street food, including of Bataka vada – fried balls of potato with coriander, coconut and lemon, and a samosa chaat recipe which I am definitely going to try – this recipe was in fact the main reason why I bought this book. Other recipes that look really interesting include Vagareli makai, a spicy sweetcorn curry with peanuts, and Renghan reveya, whole baby aubergines stuffed with a peanut spice paste. It also contains at least three different chickpea curries, and chickpea curry is probably my all-time favourite curry (see here for a very inauthentic but still yummy one).

Supper Club – Recipes and notes from the underground Restaurant – Kerstin Rodgers

Kerstin Rogers runs a supper club called the Underground Restaurant, and blogs as Ms Marmite Lover – what’s not to love? Her book describes itself as ‘a homage to the secret restaurant phenomenon’. Despite her restaurant being really near where I live, I haven’t made it there yet, mainly due to incompatible timings and my lack of being able to get my act together. It is on my must-do list, as soon as I have some free time.

The book is so brilliant - before we even get the recipes, the section at the front deals with the practicalities of running a supper club or pop-up restaurant, with really interesting insights covering all the bases – from marketing strategies, taking payments, timings, to health and safety. There is also a great directory of all pop-ups all over the world.

As Kerstin is pescatarian, there are also more recipes in this book that I can eat than in usual cookbooks. Recipes worth mentioning include Butternut squash and feta filo triangles, Gratin dauphinoise with smoked salmon, chillies en Nogada and Chocolate and marmite cupcakes. There is also a recipe for butterscotch schnapps involving putting dime bars in a bottle of vodka, and sticking the whole thing in the dishwasher.

This comment on courgette flowers also gets a mention (for obvious reasons):

‘The flowers on the end of baby courgettes are girls. There is an almost gynaecological pleasure in teasing open the petals of the flower and inserting little goodies into it. It’s lesbian cookery!’

Skinny Weeks and Weekend Feasts – Gizzi Erskine
 
I’ve got a bit of a crush on Gizzi Erskine. Before she trained at Leiths, she was a professional body piercer, and so of course my inner teenager thinks that she is just about the coolest person ever. On the cover of this book she is looking coyly into the camera whilst showing off her incredible tattooed back, and hiding a massive knife behind her back. And there is even a little pattern of angry carrots in the background. It is definitely a book to judge by its cover. In fact, the entire book’s design and graphics are probably some of the best I have ever seen.

Skinny Weeks and Weekend Feasts is essentially a diet book – instead of the 5:2 diet, it is more of a 2:5 diet. Basically, watch what you eat during the week, and indulge on the weekends. Although I haven’t been following the diet plan exactly, I have been keeping by this philosophy for the past few months, and I think that it has, slowly, been paying off. The first half of the book contains recipes for the skinny days, and the second half of the book contains recipes for weekend feasts. To emphasize her philosophy further, only the recipes in the skinny section are calorie counted.

Recipes that I definitely want to try include:

From skinny - Black lentil soup, Low fat smoked mackerel pate and Malaysian fish stew.
From feasts - Pumpkin and cashew nut curry, Watermelon gazpacho (seriously) and Peanut butter and cornflake brownies.


Well then, there was post 100, where’s my medal?


Sunday 29 September 2013

Roasted aubergine with a miso glaze


Aren’t aubergines just one of the most tasty and versatile things ever? Time to really make the most of them as we come to the end of the season and they get expensive again.

I started working on this recipe after I made the roasted halves of aubergine for the aubergine and walnut salsa recipe, and I think it is my new favourite way to cook them. This isn’t the traditional Japanese nasu dengaku as I haven’t used any sugar, but sweetened it with mirin and agave nectar. The end result isn’t as caramelised, but I think it is still really tasty. This also isn't a replacement recipe for my previous Korean-style aubergines poached in miso, it is just different.
  • 1 medium aubergine, sliced in half lengthways right through the stalk. (Use smaller aubergines for this recipe, as the bigger ones won’t cook properly all the way through before the top burns. I think the smaller ones also get a bit sweeter and juicier.)
  • Flavourless oil
  • Course sea/rock salt (I grind pink Himalayan salt rocks in a mortar and pestle) and freshly ground black pepper
  •  1 tbsp white (pale yellow) miso
  • ½ tbsp mirin
  • ½ tbsp sake (or use more mirin)
  • 1 tbsp agave nectar
  • 1 tbsp sesame oil
  • 1 tsp rice vinegar
  •  Sesame seeds
  • Spring onions, green and white parts finely sliced into rounds

The oven I was using doesn’t have exact temperatures, so I’m no sure exactly what temperature I have been making this at, other than ‘hot’. Probably stick your oven on 190-200 centigrade and I think that would be ok.

Score the aubergine halves in a narrow criss-cross pattern – ending up with diamond shapes with roughly 1 – 1.5 cm sides. You can make them smaller than that if you want to, just be careful that the knife doesn’t pierce the skin out the back of the aubergine half. Brush them with oil and sprinkle with the salt and grind some pepper over them. Roast the aubergines (cut side up) for 30-45 minutes, until they are cooked through, the diamond shapes have separated out, and the flesh is a dark golden colour. Take them out of the oven but keep the oven on for the next stage.

While the aubergines are in the oven, mix the miso with the mirin, sake, agave, sesame oil and rice vinegar with a tablespoon of hot water until fully incorporated. You could, I suppose warm everything together in a saucepan without having to use hot water, but to be honest I can rarely be bothered to get another pan dirty if I don’t have to.

Spoon the miso sauce over the cut surface of the aubergines after they have finished roasting. Do it generously enough that it fills the grooves around the diamonds, but not so that it is completely swamped. Sprinkle the surface with sesame seeds, and put the whole thing back in the oven for another 10 minutes.

Serve this scattered with spring onions, and with warm sushi or jasmine rice, and any remaining sauce for drizzling.

Tuesday 24 September 2013

Cauliflower and Stilton Soup


Inspired by Claudie

I really love September. It is a time for renewal, and new intentions.

Rosh Hashanna (Jewish New Year) was a few weeks ago, and for the past three years I have celebrated, and participated with an incredible community called Grassroots Jews. Grassroots Jews is a temporary community that comes together for the High Holy days (Jewish New Year and the Day of Atonement) to create an inclusive spiritual environment, focused around the ideals of inclusivity, participation and co-creation. Observing the days with the Grassroots community has also been the first time I have ever felt any real spiritual connection to this incredibly significant part of the Jewish year.

At Rosh Hashanna I always make some resolutions. They are more ‘intentions’ than ‘resolutions’, and I use them to give a bit of purpose to the year ahead – as opposed to the traditional sort of resolution that seems to exist only to be broken. For example, three years ago I set the intention of having more adventures and putting my creativity into the world – and that is how this blog was born.

Every year some of my intentions are profound, and some are more prosaic. This Rosh Hashanna my intentions included ‘keeping things simple’ and ‘eat more cauliflower’.

This soup is, obviously, born of both of those intentions. It is amazing how you can take so few ingredients and create something with such depth of flavour. It is rich and creamy; perfect comfort food for when the weather starts to get miserable. A bowl would probably be in a meal in itself, so serve small portions if you want to eat more food as well.

Serves 6-8 with a bit left over

1 large cauliflower, finely slice the stalk and separate the top into florets
1 large potato, diced (you don’t need to bother peeling it)
1 large onion, diced
1 tbsp olive or rapeseed oil
1 vegetable or chicken stock cube dissolved in 1 litre of hot water
Approx 75g blue Stilton, cut into little lumps (more or less according to your taste)
Salt and pepper

Heat the oil in a large saucepan, and fry the onion until lightly browned. Add the diced potato, and fry for another 5 minutes or so until the onions are a little more caramelised and the potatoes have taken on a little colour too.

Add the sliced cauliflower stalks, stock, and a big pinch of salt, and bring to the boil and let it bubble for about 10 minutes.

Add the rest of the cauliflower, put a lid on the saucepan and bring it to a simmer – you can add another 250ml of hot water if you want the soup a little thinner – but don’t add much more than that.

Simmer the soup for about 15 minutes from when the cauliflower florets go in. When it is ready and the veggies are soft, blitz with an immersion blender. Add the Stilton, and blitz a little more. The soup should be really thick and creamy so make an effort to blitz out all the lumps. The cheese is salty so don’t add any more salt until it has been blended in – but make sure you taste and season once it has.

Goes very well with garlic-y croutons.

Here is a nice thing to do with your leftover Stilton: Butternut Squash, Sage and Hazelnut Risotto with Blue Cheese.

Inside the Grassroots Ohel (tent) - I was very impressed by their use of the pomegranate motif,  although I felt like I couldn't associate it with eroticism in the same way as normal pomegranates....